In the last couple of years, Artificial Intelligence (AI) has shown tremendous growth opportunities. It is rapidly improving and changing the way we interact, shop and work. AI has become so ubiquitous in our daily lives that it has eliminated a lot of laborious tasks. Many organisations ranging from large enterprises to small businesses are using AI to create productive and smart solutions. These solutions do not just boost the human creativity but also optimise the overall costs. However, the results of these AI based solutions are tailored for masses rather than a specific set of people. They clearly lack the relevance or personalisation aspect. As a result of that, in this post (and the next ones), we'll learn how you can easily create personalised experiences for your web or mobile apps, bots and much more just through Azure.
 So how would you feel as opposed to the list of your choice of clothing, based upon your own interests? I am sure you'd want that. Everyone wants that. So, the question is, can we really optimise for the best outcome, that too with real-time learning and amongst a given set of choices? The answer is yes with Reinforcement Learning.
 It is always recommended that exploration percentage is set between 10% to 20% and:
 In order to understand the top action item (
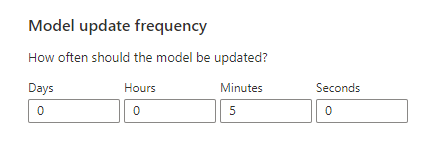
Why do we need this?
In the machine learning (or broadly AI based solutions) world, the baseline approach has always been the Supervised Learning. It does have great successes in many use-cases but that's not super useful everywhere. Let's take an example of yourself. You use a shopping app to buy some clothes. This app shows the lists of the products which are usually featured or on sale. Now imagine, that the list which you see does not show any item of your interest. This means that it shows some different colors, size or style. You may click on it or maybe you don't. Therefore, almost every time you may want to search or filter out your favorites from the list and it is not going to be an easy process always. The supervised learning here fails because it's too much of a work to identify what's right for a specific set of contexts (or people). You may also want to avoid self-fulfilling prophecy problem.
So how would you feel as opposed to the list of your choice of clothing, based upon your own interests? I am sure you'd want that. Everyone wants that. So, the question is, can we really optimise for the best outcome, that too with real-time learning and amongst a given set of choices? The answer is yes with Reinforcement Learning.
Reinforcement Learning is an approach to machine learning that learns behaviors by getting feedback from its use.Personalisation is the hallmark of a customer centric focus. It makes customers feel valued and helps businesses provide the CX which are narrowed or specific to their needs and wants. Based upon some of the latest trends and our above example, 80% of the customers are those who are more likely to buy from those who provide personalised experience. In addition to this 72% of the customers are more interested in engaging with personalised messaging by the bots. Lastly, just to re-iterate its importance, 50% of the Australians think that they would switch to a competitor after one bad experience which means it is very critical for businesses to start thinking about it.
Azure Personalizer
Whilst there can be many ways, we as a matter of our interest, will use Azure Personalizer to build the personalised experiences for the customers. Personalizer uses reinforcement learning to make some smart decisions for your applications. We will also see how you can boost conversion and engagement as well as add real-time relevance to your product recommendations. Unlike the usual recommendation engines which offer a few options from the large dataset, Personalizer gives the single best outcome for the user every time. gives customer relevant experiences that improve over the time based upon their behavior. It improves the click-through rates and remain on of changing trends. Personalizer can get you the best outcomes for variety of business use-cases. Some of them are:- News article based upon the interests of the reader
- Food order on the basis of occasions and dietary requirements
- Perfect gift for the Mother's Day
In rest of the post, I've taken a personalized dessert example, just to explain you the concepts in an easier way
Learning Loop
Each Personalizer resource you create from your portal is considered as one Learning Loop. This is essentially for a single personalization use-case. If you have got more than one in your app then you may want to create more than one. In our case, we will just create one. It's as simple as below.
Rank
Personalizer learns over the time what (actions) you should show your users in a given situation (or a context). Rank is basically an answer / single best decision a personalizer determines and responds back. It's also considered as one of the two primary APIs of Personalizer. Every time your app has to make a decision, the Rank API is called. This API expects actions (with an ID), features associated with each action and features that describe the current context. Each API call is known as an event and distinguished with anevent ID (you can assume it as guid). Personalizer service then returns the ID of the best action which is determined by its model. Now I have spoken about quite a few new terminologies here, let's learn about each of them.
string eventId = Guid.NewGuid().ToString();
var request = new PersonalizerRankOptions(actionList, currentContextFeatures, null, eventId);
PersonalizerRankResult result = client.Rank(request);
Actions
Actions are the unique set of items which are meant to be chosen or selected. They can be anything from products to promotions to news articles to ad placements on the website and much more. Actions have got the list of features which describe them. Basically, they are the metadata about the content. For example, if the action is a dessert, then its features are comprised of sweet level, cuisine and category....
new PersonalizerRankableAction(
id: "banoffee_pie",
features:
new List<object>() { new { variety = "dessert", sweetlevel = "medium" }, new { nutritionalLevel = 5 } }
),
new PersonalizerRankableAction(
id: "mango_delight",
features:
new List<object>() { new { variety = "shake", sweetlevel = "medium" }, new { nutritionLevel = 2 }, new { drink = true } }
),
new PersonalizerRankableAction(
id: "tresleches_cake",
features:
new List<object>() { new { variety = "cake", sweetlevel = "high" }, new { nutritionLevel = 3, cuisine = "mexican" } }
),
...
There's a limit of 50 actions but no limit on the number of features one action can have. It is also advised that features should be meaningful and effective for the specific action. It is also not necessary that all the actions should have the similar set of features.
Context
Context or Context Features are quite interchangeable (hence confusing). It is basically the metadata about the context in which the content (e.g., a personalised product) is presented. Context can literally be anything such as user, demographic information, weather, time, historical data, device and so on. The recommendation is to use the name for context features that are UTF-8 based and start with the different letters, such asvariety and occasion, device. Having similar namespaces (or names) of the context features can result in collisions in indexes used for machine learning.
The Rank API expects four parameters;
- List of all the Actions
- Current context features
- Features to exclude
- Event ID (
guid)
{
    "contextFeatures": [
        {
          "occasion": "birthday",
          "variety": "cake",
          "weather": "sunny"
        }
        ...
    ]
}
Both for action and context, it is always recommended to have more dense features rather than a sparse feature. For example, there can be many bakers' confectioneries which can be classified as cakes and cupcakes. That's considered as a dense feature. Contrary to this, same features can also have a Name attribute which will be quite unique among every feature. This is a considered as a sparse feature.
Once the request is sent to the Rank API, then the API decides to either exploit or explore to return the top action (RewardActionId). Now what's that? Let's learn about them!
Exploit
When Personalizer service chooses an action which matches the highest probability in the rank. This is called exploitation. This happens (100 - exploration) % of the time.Explore
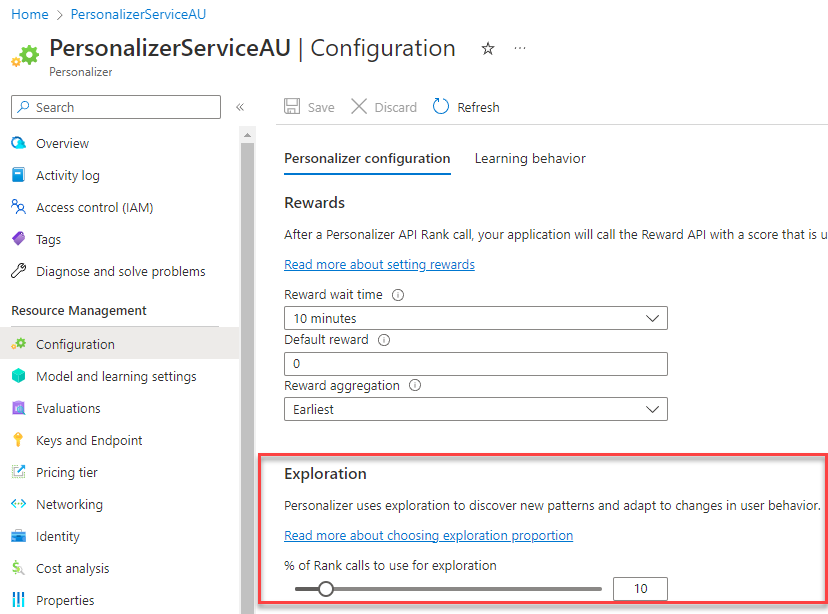
When Personalizer service chooses an action which does not match the highest probability in the rank. The percentage of exploring the outcome is based upon the configuration in Azure. Currently, personalizer uses epsilon greedy algorithm to explore. This is different than the behavior in some A/B frameworks that lock a treatment on specific user IDs.
It is always recommended that exploration percentage is set between 10% to 20% and:
- Not to have 0% as it will not use any benefits of Personalizer as in this case, it will lead to model stagnation, drift and eventually lower the performance.
- Not to have 100% will negate the benefits of learning from user behavior as in this case, it will always try to get a random response rather than a top action item.
In order to understand the top action item (RewardActionId) returned by the Rank API, it is important for us to learn about the Rewards.
Reward
Reward is a score that your business logic determines as a measure of success, just to validate the decision taken by the Rank API (or broadly Personalizer) is good (leaning towards 1) or bad (leaning towards 0). For example, if the Rank API suggests a news article or promotional offer and user clicks on it, then the score can be considered as high as 1 because the user chooses it. Reward is considered as second of the two primary APIs for Personalizer. Reward API expects two parameters- Event ID (the same
guidyou send to Rank API). This is an optional parameter, if it's not sent then Personalizer will generate automatically generate one. - Reward (between 0 or 1, depending upon the business logic)
public void SubmitReward(string eventId, float reward)
{
    client.Reward(eventId, reward);
}
Model
Every learning loop (defined above) has a model that learns about the user behavior. It gets training data from the combination of the results you send to Rank and Reward APIs. This training happens as per the model update frequency defined in the configuration. In my case, as I was training it using the simulator which I built to test my model. I set it up to update every 5 minutes as I was testing. Ideally, it can be hours or even days based upon your needs.
Learning Policy
Personalizer trains a model on the basis of its learning behavior defined in the configuration. This enables the functionality of how the machine learning works. There are two basic modes and you can see that I've chosen the first one as my use-case of suggestion the best dessert was OK to use it.It takes at least 100 to 10,000 calls for Personalizer to start behaving well so you need to be mindful of tests
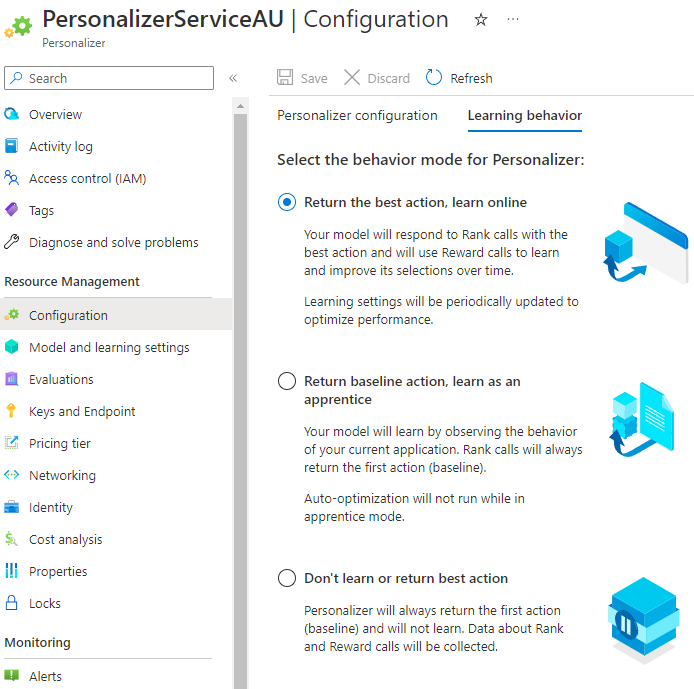
Online Mode
This is the default mode (or behavior) of a personalizer where it uses machine learning to build the model that predicts the top action (or content) for use-case. This is improved time by time when the Rank and Reward calls are made.Apprentice Mode
Just like in real life where an apprentice learns from their experience, it's the same in case of Personalizer. This is different than an online mode where it tries to predict the random values right from the start impacting the application with the cold start problem. Rank calls, in this case, always returns the application's default actions i.e., the action your app would have taken without using the Personalizer. Once the Personalizer is trained well, the learning behavior can then be switched to the online mode for better results.If you want to create your own library, then you may need to download the preview SDK for Personalizer from NuGet package managerI have now created a complete library which can be used easily in your projects despite my dessert use-case. It's been one of the longest posts I have written so far on this topic, but I truly think that is really valuable for you to understand the basic concepts before you get your hands with it. Personalizer is a complex service and require some patience too (as it does not train in seconds or even minutes). In my next post I will try to discuss the simulation aspect of it as well as application of this service. If you've got any questions, please write down in the comments section. Until next time.